Here is my first cake. *sigh*. It was a valiant try I think. I spent Friday night gathering items I thought I would need to start decorating, and I spent Saturday finding items that I didn't know I would ever need. Soooo, my itinerary of making the cake on Saturday and decorating on Sunday kind of got postponed. Who would have thought one would need meringue powder to make frosting? Well, just how do you think frosting can be so rich, yet fluffy? Not moi. Yes, my friends, it's meringue. I bet you didn't even know there was such a thing as meringue powder, because I sure didn't. I could have stuck with the ole C&H recipe of butter, vanilla, milk, and powdered sugar; but if I'm going to do this, I should do it right, RIGHT? Meringue powder is not cheap, but it sure is fun. I was so impressed with the finished result I have four buckets of the stuff in four colors in the freezer. If it's frozen, I'm less likely to pig out on it.
This was truly an adventure. I tried to do everything so right, you know I went wrong somewhere. I misread the original recipe for the cake and thought it said "makes two 8" layers". So I poured what I perceived as half of the batter into the first layer of my sparkling new 8" springform pan. It said 45-50 minutes per layer, which in Duncan Hines speak, is an eternity. Well baby, this aint Duncan Hines. After about 20 looong minutes I peeked in on my lovingly crafted dessert and saw that it bubbled up about 2 inches from the top of the pan. Ummm, maybe I better look back at that recipe. It sure seemed like a lot of batter, but you know, not all cakes rise really well. Sure enough, it said "Makes two 8" two layer cakes". OOPS! Well, at least I have enough batter left over right? I thought I might just cut my one huge layer into two, but alas, the bubble deflated, leaving a huge crater that if I'm lucky, left about an inch of usable cake.
I decided to try conventional cake pans with the extra batter this time - heavily greased and floured. Alas, they wouldn't separate from the pan and they tasted awful.
My second (well, technically THIRD) attempt at making the cake came out brilliantly. I only made a half recipe so I did not get to taste it until I cut into it at work the following day and I was not disappointed. It was a thick chocolate cake that was perfectly moist. In fact, two unrefrigerated days later it still tastes as fresh as the first day.
Lessons learned in this section:
1. Read the instructions THOROUGHLY
2. Use the ingredients the recipe calls for. I substituted cream of tartar and milk for buttermilk. I also substituted salted butter for unsalted. The result was a gooey, salty mess that might remind someone of a pile of dirt. That's what husbands are for though, to clean up our yucky messes via their mouths.
3. Use Springform pans, just don't overfill them. The cakes come out much more level, minimizing the amount of leveling you need to do, which, for a beginner is essential.
Now on to the decorating. Because I was not salivating for a taste of my work (I practiced a great deal of restraint, partially because I had been sampling the frosting all day); I was able to let the cakes cool properly before even thinking about messing with them.
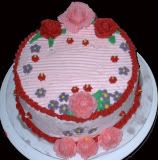
I am really interested in fondant, because I like the look, but I wanted to learn more classical techniques first (and buttercream tastes better). What I perceive to be one of the hardest "basic" techniques would be that of buttercream roses. As I result I went hog wild and made more roses than what you see in the picture. My first two roses looked decent, but then I realized I had the tip the wrong way. When I turned it around the result was a much more delicate and "real" looking petal. The red frosting shown above was much more liquified than the pink, giving it the thicker appearance, but by the time I got to them it was 9pm Sunday, and Monday was quickly approaching. The instructions I read for the roses suggested using a fondant base. The only problem with this is that for my inexperienced hands, the rose becomes very heavy on the nail quickly, and several of my masterpieces slid off into oblivion before their last petal was placed. This elicited a small cry from me.
I made the larger roses out of gumpaste. A much easier feat in my humble opinion; molding with my hands was much easier than molding with a globby bag of frosting. The only drawback is that the material dries quickly, and while water will help, it also makes it stickier.
I have not tried icing with fondant yet, so I cannot truly attest to the level of skill it requires, but I can say icing with buttercream has to be one of the harder tasks. Trying to smooth what is basically soft butter onto crumby (literally) cake sides is a load of fun; especially when you only have a small icing spatula. I ended up using an icing comb to camoflauge the uneven terrain, but as you can see, was pretty unsuccessful. I know now that doing a crumb coating of icing all but eliminates this pesky problem.
Lessons learned in this section:
1. Read the instructions on using the tip. Otherwise you'll look even more stupid and inexperienced.
2. Have more than one size spatula
3. Crumb coat the cake first. That way your pink icing won't be pink with hints of brown that may or may not look like a small insect.
4. Work very quickly with thin gumpaste, you get a second chance, but as with tests, you really should stick with your first answer.
It really was a lot of fun and a decent hit at work. The biggest compliment I got was when a lady I work with thanked me for bringing in the cake and then inquired about "how THEY made the base of the flowers because it was interesting". When I told her that *THEY* was ME she was shocked. Most honestly thought I had brought it in from a store, and were really impressed with the hand made roses; which for an experienced cake decorator is an insult, but for a beginner is the biggest compliment you can give. The picture really does not do it justice, it adds ten pounds.
1 comment:
You are on such a great adventure...best of luck to you!
Post a Comment